How to Photograph Your Invention for Design Patent Drawings
- IP DaVinci
- Article
- June 6, 2025
Table of Contents
If your client doesn’t have a 3D CAD model of their invention, you can still get formal, USPTO-compliant design patent drawings — as long as the photos are correct.
This guide makes sure your filing isn’t delayed by poor reference materials, missed views, or perspective errors. Whether you’re an IP attorney or working with inventors, simply forward this page and receive a drawing-ready photo set without extra back-and-forth.
✅ Why It Matters
- ✔️ USPTO-compliant drawings require exact views — all must align geometrically.
- ⚠️ Missing or misaligned photos cause redrawing delays, higher costs, or office actions.
- 📩 This guide helps your clients capture the right angles the first time.
📸 Required Photo Set (13 Views)
Ask your client to photograph the invention in the 13 standard views listed below. These views match USPTO expectations and enable us to reconstruct an accurate, compliant figure set.
| View | Description |
|---|---|
| Top View | Directly from above |
| Bottom View | Directly from below |
| Front View | Directly facing the front |
| Back View | Directly facing the back |
| Left Side View | Profile from the left |
| Right Side View | Profile from the right |
| Top-Front-Right Perspective | Angled downward from top, front, right |
| Top-Front-Left Perspective | Angled downward from top, front, left |
| Top-Back-Right Perspective | Angled downward from top, back, right |
| Top-Back-Left Perspective | Angled downward from top, back, left |
| Bottom-Front-Right Perspective | Angled upward from bottom, front, right |
| Bottom-Front-Left Perspective | Angled upward from bottom, front, left |
| Bottom-Back-Right Perspective | Angled upward from bottom, back, right |
📌 Optional but helpful: If your design has intricate or recessed features, please include 1–2 close-up photos. These help us faithfully render details.
🛠️ How to Photograph Properly
- Use a smartphone or digital camera.
- Place the object on a clean, flat surface with a neutral background.
- Shoot perpendicularly for orthogonal views (no tilting).
- Make sure nothing is cropped or cut off.
- Use even lighting (natural or soft lamp) to avoid harsh shadows.
📨 Submitting the Photos
- Capture all 13 required views.
- Name the files clearly:
top.jpg,front.jpg,top-front-right.jpg, etc. - Zip the set or upload to Dropbox/Google Drive.
- Email the link to [email protected] or share with your attorney.
💡 Pro Tips to Avoid Redos
- Shoot in a well-lit room — poor contrast hides critical design elements.
- Avoid reflections and fingerprints on glossy or curved surfaces.
- If parts move (fold, rotate, extend), photograph each position.
- Don’t use flash — use soft ambient light for consistent visibility.
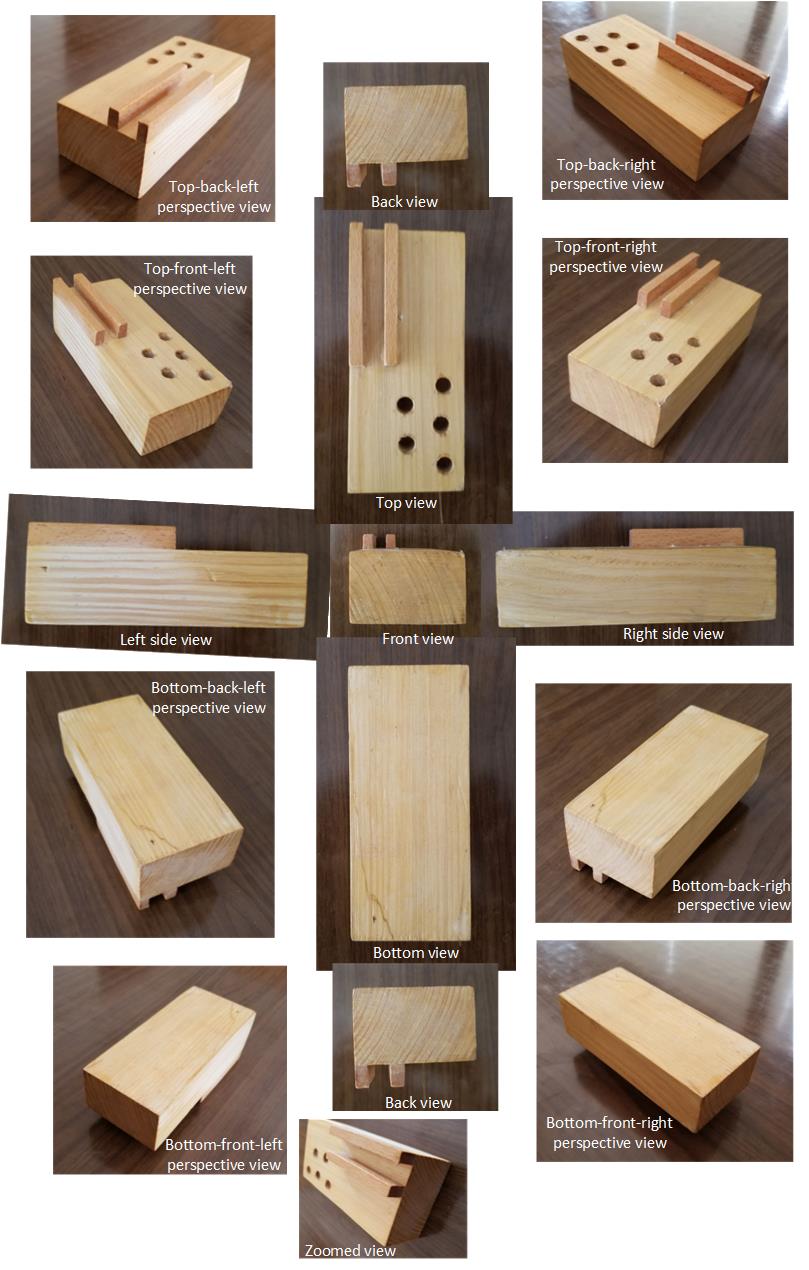
👁️ Example Photo Set
Here’s what a complete and usable photo set looks like (click to enlarge):

🎯 Want Faster Drawings — and Fewer Rejections?
STIPPLES by IP DaVinci makes photo-to-drawing conversion faster and smarter:
- 📐 Drawings generated from accurate 3D models
- ✨ Stipple shading and cross-sections auto-generated
- 🚫 No rejections for missing views or inconsistent geometry
- 📋 Ready-to-file deliverables you can send to clients same-day
🚀 Turn Photos into Stronger Design Patents
Cut drawing delays, improve quality, and avoid costly objections.
